Monday, April 12, 2021

Zeiss Ikon Box-Tengor 54/2 (1934-1938)

The Box-Tengor was one of Zeiss Ikon's cameras for beginners. It makes eight nominally 6cm x 9cm (actually 58mm x 88mm) pictures on size 120 film.


The body is formed from steel and has black leatherette and black painted trim with a little nickel plate. The handle is leather. The front of the camera has the viewfinder windows, the focus zone selection lever, the lens, and the aperture selection lever. The right side of the camera has the film winding key, the landscape oriented viewfinder window, the time/instantaneous exposure tab, the camera body latch, the shutter release lever, the shutter lever latch and a cable release socket. The pre-WWII Box-Tengor is not synchronized for flash. The left side of the camera has a tripod socket for pictures in landscape orientation. The back of the camera has the little red window with its sliding cover. The top of the camera has the portrait oriented viewfinder window and the handle. The bottom of the camera has the portrait oriented tripod socket.

The lens is an uncoated, Goerz Frontar meniscus with a focal length of about 100-110 mm. Objects from 8 meters to infinity are in focus at the distant setting. For closer focusing additional lens elements can be shifted into place using the lever above the lens. The closer focus zones are 8 to 2 meters (the lower strength element) and 2 meters to 1 meter (the higher strength element). Eight meters is about 26 feet, two meters 7 feet and one meter 3-1/2 feet. The Goerz name on the lens came from C. P. Goerz, which was one of the firms that merged to form Zeiss Ikon in 1926, and made an earlier version of the Box-Tengor. Aperture stops, f/11, f/16 or f/22, can be shifted into place using the lever below the lens.

The shutter is a rotary shutter with a nominal speed of 1/25 second per the instruction booklet. A slide can be pulled out for time exposures. The shutter release has a latch that can be used as a safety catch to prevent accidental exposures or used to hold the shutter open for time exposures. There is a threaded socket for a standard cable release. Two 3/8" tripod sockets are provided.

Loading the camera is like loading a Brownie. You unlatch the back and pull it open for loading. The empty spool goes in the top compartment and the fresh film goes in the bottom. You space the pictures on the film by looking through the little red window at the numbers printed on the backing paper. The slide over the red window is kept closed except when winding the film. The camera was made when films were much slower than they are today. 100 speed film is over exposed about 1 stop with the camera set at f/22 on a sunny day. 400 speed film is good on a cloudy day or in the shade.

Because the camera is not synchronized for flash (you need the post-WWII 56/2 model for that), you have to use the open flash method for pictures indoors at night. You put the camera on a tripod, set up your shot, turn down the room lights (the room should be dark enough to avoid "ghost" images), open the shutter, fire the flash, and close the shutter.

This example is in good shape for being at least 82 years old. There are a few spots in the viewfinders and some wear to the finish. Box-Tengors were made in the hundreds of thousands and they are relatively common.

The bow scroll from the armored cruiser USS Tennessee, Centennial Park, Nashville, Tennessee.

The Tennessee was completed in 1906. Originally the ship was painted white and buff and had this decorative bronze bow scroll. The bow scroll was removed from the ship when it was modernized about 1911, and was installed in Centennial Park. In May of 1916 the armored cruiser was renamed USS Memphis and in August of that year was wrecked by a tidal wave in Santo Domingo harbor.

Wednesday, March 17, 2021

Minox Flash Attachments

Minox Gadgets, Gimmicks and Gizmos, Episode 3.

Here are three Minox flash units. These were not the only ones that were made, but they are three that I have.

Minox AG-1 Flash.


The Minox AG-1 Flash let AG-1 "peanut" flash bulbs be used with a Minox B. The flash unit was a battery-capacitor flash that used a 15V battery. The flash range was 15 to 40 feet with ISO 100 film. The flash unit used a small slide to retract the reflector and eject the flashbulb. Because flash bulbs are out of production, this is not really a useful device any longer.

Minox Flashcube Holder.


The Minox fashcube holder let flashcubes be used with a Minox B. Unlike most cameras that used flash cubes, the Minox did not turn the flash cube to a fresh bulb automatically. You had to turn the flashcube manually, which required a little care to avoid scorched fingers. Flash cubes are also a thing of the past.

Minox 8x11 Flash.


The Minox 8x11 electronic flash came out about 1990 for the Minox EC camera and has an adapter for use with the Minox B and later cameras. The original list price for the flash unit and an adapter was $49. The flash unit is made of black plastic. It uses one 1.5V AA battery. The Minox B will sync with the 8x11 Flash at 1/100 second. The adapter covers part of the meter window of the Minox B; therefore, you will want to remove the flash in order to use the exposure meter in daylight. The flash range is 6 to 12 feet with 100 speed film or 12 to 24 feet with 400 speed film. Using the green filter reduces the flash range by about 1/3. Using the neutral gray filter reduces the flash range by about 2/3. The unit is small (3 inches by 2 inches by 3/4 inch) and weighs 2-1/2 ounces with a battery inside. The 8x11 flash is probably the most useful flash attachment.

The earliest Minox cameras did not have shutters that synchronized with flash. The model IIIs that came out in 1954 was the first Minox that was sync'ed for flash.

Thursday, March 11, 2021

Minox Daylight Developing Tank.

Minox Gadgets, Gimmicks and Gizmos, Episode 2.

The Minox daylight developing tank holds one 50 exposure roll of film and just 56 ml of solution, and can be used in ordinary room light throughout the loading and developing process. The developing tank has three main parts: the drum, the sealing ring and the tank. The drum screws into the sealing ring, the end of the film hooks onto the drum, the film cassette goes inside a compartment in the sealing ring, and the sealing ring goes onto the tank. The interior of the tank is light tight. Turning the drum pulls the film from the cassette in total darkness and the film spirals, emulsion side out, around the drum as the drum screws into the tank. With 36 exposure rolls of film the drum does not go all the way into the tank. The tank is still light tight, but it uses about 10 ml more solution because the drum doesn't completely fill the interior of the tank. To help reduce developer waste, Minox had a doughnut shaped stop ring to take up the extra space. Once the film is loaded the chemicals for processing film may be poured into the tank. A thermometer inserted into the top of the drum monitors the temperature and serves as an agitator rod. Moving the thermometer up and down pumps the solutions around the film. After the film is processed and washed in the tank, the sealing ring is removed and the film is unwound from the drum and hung up to dry. The negatives are then cut into strips for filing in negative sleeves. Minox made an enlarger capable of making 11x14 inch prints from an 8x11 mm negative, a 30 times enlargement.

Tank, Drum, Sealing Ring and Stop Ring

Film Hooked to Drum

Assembled and Ready for Processing

Minox no longer sells film or chemicals. Currently Minox loads of color or black and white film are available from Blue Moon Camera and Machine, and any fine grain black and white developer may be used.

Minox had many accessories for sub-miniature camera photography. There are more episodes to come.

From a negative developed in a Minox daylight developing tank.

Saturday, March 6, 2021

Minox Lens Filters

Minox Gadgets, Gimmicks and Gizmos, Episode 1.

Built-in Filters.

The Minox B has three lens filters built in. The clear cover in front of the lens is a UV filter and is always present. The green 2x filter and the neutral gray 10x filter slide between the lens and the cover. The green filter is a contrast filter for black and white pictures, and provides exposure control for bright days outdoors or for flash pictures indoors. The gray filter provides exposure control for either black and white or color film. The selected filter stays in front of the lens until you slide it out of the way. Filters require increased exposure times as indicated by the filter factor. A 2x factor means twice the exposure.

Top to Bottom: UV, 2x Green, 10x Gray

With no sliding filter selected, you match the triangle on the exposure meter dial to the meter needle. With the green filter selected, you match the green dot on the exposure meter dial to the meter needle. With the gray filter selected, the meter automatically compensates for the filter and you match the triangle to the meter needle.


Snap-on Filters.

Minox snap-on filters fit a holder that snaps onto the camera. The holder has a white dot on the top to show which way is up so the holder matches the contours of the camera. The filters are tiny and easy to drop.

Black and White.


Minox black and white filters for the Minox B are yellow, orange and blue. Each filter has the filter factor engraved. They provide contrast control for black and white film. The yellow filter provides more contrast between the sky and the landscape. The orange filter is equivalent to the orange filter that is built in the Minox IIIS. The blue filter improves skin tones with flash.

Color.


The set of Minox color filters consisted of a light skylight filter, a medium skylight filter and a blue filter for flash pictures using clear flashbulbs. The color filters had the filter factors engraved on each filter. The light skylight filter is for sunlit subjects under a bright blue sky. The medium skylight filter is for subjects in the shade. The blue filter is for use with daylight balanced film and clear flashbulbs indoors. It would not be needed with blue flashbulbs or electronic flash.

Minox had many accessories for sub-miniature camera photography. There are more episodes to come.

Thursday, March 4, 2021

Vivitar 220/SL (1976)

The Vivitar 220/SL was manufactured for Vivitar by Cosina Co., Ltd. in Nagano, Japan, beginning in 1976. It strongly resembles the Argus/Cosina STL 1000 that came out in 1970. Vivitar was a trade name that Max Ponder and John Best used for imported lenses, cameras and accessories. Ponder and Best, Inc. eventually became Vivitar Corp. Vivitar was a bargain brand; the list price of a 220/SL with a lens was about $180.


The camera has a metal body and a black finish. The top of the camera has the film loaded indicator, the rewind crank, the flash shoe, the shutter speed dial, the film speed dial, the shutter release, the film advance lever and the exposure counter. The front of the camera has the self timer lever, the M42 lens mount and the exposure meter switch. The bottom of the camera has the rewind button, the tripod socket and the battery compartment. The left side of the camera has PC sync sockets for flash bulbs (M) and electronic flash (X).

The shutter speeds run from 1 second to 1/1000 second plus bulb. The shutter is a metal, vertically running Copal shutter that syncs with electronic flash at 1/125 second or longer exposures. The shutter is completely mechanical. No battery is needed except for the light meter.

The lens mount is a 42 mm screw mount (Pentax/Praktica/Universal/M42 lens mount). The camera came with either an f/2.8, 55 mm lens with four elements in three groups or an f/1.8, 50 mm lens with six elements in four groups. Most M42 mount lenses will fit this camera. An f/2.8 35mm Vivitar lens is on the camera now.

The camera has a through the lens exposure meter. The meter needle is visible in the lower right of the viewfinder. To get an exposure reading you press a switch on the lens mount to simultaneously stop down auto diaphragm lenses to shooting aperture and turn the light meter on. The picture is correctly exposed when the needle is centered between the brackets, underexposed when it is down toward the "-" sign, and over exposed when up toward the "+" sign. The meter gives an average reading over the entire picture and can be fooled by uneven lighting. The meter can be set for ASA (now ISO) film speeds from 24 to 1600. With 100 speed film the metering range is from EV 3 (average indoor scenes) to EV 18 (extremely bright daylight).

The exposure meter is powered by a size 675 button cell. The required 1.35 volt mercury cell is no longer available because of the toxicity of mercury. A 1.4 volt zinc-air hearing aid battery is close, but the meter readings on my camera were not very accurate with a hearing aid battery. You can just ignore the camera's meter and use a handheld exposure meter or use the camera settings recommended in the data sheet for your film.

For focusing the viewfinder has a central micro-prism circle surrounded by a ground glass ring. The micro-prisms tend to black out with telephoto lenses. When that happens you would use the ground glass area to focus.

The rewind crank pulls up to open the back for loading film and the exposure counter resets to "start" when the back is opened. It takes three pulls on the film advance lever to reach the first frame, and one pull on the lever to advance to subsequent frames. An indicator next to the rewind crank shows red when there's film in the camera.

The Vivitar 220/SL is an average, low-price, manual 35 mm SLR. You can buy one nowadays for about $20.

Sample Photo with a 28mm wide angle lens

Thursday, December 10, 2020

Argus Standard C3 (1958-1966)

In 1958 Argus gave the C3 a face lift and produced the Match-Matic C3 and the Standard C3 models. The differences are mostly cosmetic. Mechanically and optically both versions are like the previous C3. 


The Standard C3 is the plain-jane version with all-black leatherette and normal f-stop and shutter speed markings. More than 2 million C3s were made between 1939 and 1966. About 129,000 of them were the Standard C3 model. This example was made in 1959. The Sears catalog listed a Standard C3 camera for $39 ($250 in depreciated 2020 dollars).

The camera body is molded phenolic resin plastic. The front and back are die cast metal trimmed in black leatherette and chrome. The top of the camera has the film advance knob, the accessory shoe, the exposure dial, the film catch and the shutter button. The front of the camera has the shutter cocking lever, the range finder dial, the idler gear that connected the range finder to the lens, the lens, and the shutter speed dial. The bottom of the camera has the tripod socket and the film rewind knob. The back is hinged on the left and the latch is on the right. The camera does not have strap lugs. If you want to use a neck strap you put the camera in its case. Alternatively, you can use a strap that attaches to the tripod socket. The camera is more comfortable to hold when it is in its case.

The standard lens is an f/3.5-f/16, coated Argus Cintar lens with three elements in three groups. Because the lens rotates as it focuses the aperture ring has three scales around the perimeter so one is always easy to see from the top. There aren't any click stops. The lens will take Series V drop-in filters.

The shutter is a behind the lens leaf shutter with three blades. The shutter speed dial is marked from 1/300 to 1/10 second. For time exposures you turned the shutter button from "I" to "B" and used a cable release that screwed into the button. Argus used their "Color-matic" system to simplify exposure settings. For sunny day snapshots with ASA 10 Kodachrome film you used the yellow settings (f/6.3 and 1/50 second). With ordinary black and white film in sunny weather you used the red settings (f/8 and 1/100). The green setting (1/25) is for flash bulbs indoors or at night and has an icon of a flash bulb as an additional reminder. A label in the top of the leather case reminded you of the settings. With the standard 50mm lens you set the distance at 15 ft. (marked with triangles on the range finder dial) for subjects 10 or more ft. away to be in focus.

The viewfinder and range finder are separate. The viewfinder is a reverse galilean type that reduces the image by about half and shows the field of view of the standard 50 mm lens. The range finder is a split image type that is coupled to the lens by the idler gear. Turn the lens to focus. Your subject is in focus when the two halves visible in the range finder window are aligned. The range finder is not magnified.

The standard 50mm lens could be unscrewed and replaced with an Argus Sandmar 100mm telephoto lens or an Argus Sandmar 35mm wide angle lens. A viewfinder that slipped into the accessory shoe showed the correct fields of view for the 35mm and 100mm focal lengths. The accessory lenses were made by Enna-Werk, Munich, Germany. A Soligor 135 mm lens made in Japan was also available. The accessory lenses are coupled to the range finder by the same idler gear as the standard 50mm lens.

Argus made a flasholder that plugged into the right side of the camera. At some point the German company Kaiser made an adapter for flashes having standard PC sync connections. This adapter will work with electronic flashes.

An Argus LS-3 selenium cell light meter was available to fit the accessory shoe on the Standard C3. A modern light meter such as a Sekonic L-208 Twinmate will fit the accessory shoe.

To load film you open the back, put the film cassette into the right side of the camera and insert the leader into the take-up spindle on the left side of the camera. You next close the camera back and turn the film winding knob until it stops. To advance the film you push the film catch and turn the film advance knob about a quarter turn, let go of the film advance lever, and continue to turn the film advance knob until it stops. You do this twice more. The next step is to turn the exposure dial counterclockwise until zero is against the index mark. You are ready to make the first exposure. Check your focus, aperture and shutter speed, cock the shutter and press the shutter button, being sure to keep your fingers away from the shutter cocking lever. Advance the film immediately after taking a picture. There isn't any double exposure prevention or skipped frame prevention.
The C3 was one of the the most basic adjustable cameras you could buy.

Wednesday, November 18, 2020

Nikon Nikkormat FT2 (1975-77)

About 500,000 Nikkormat FT2 cameras were made by Nikon from 1975 to 1977. It sold with a standard f/2 50 mm lens, and an f/1.4 50 mm or f/1.2 55 mm lens was available as an extra cost option. The complete range of Nikkor F mount lenses available at the time could be used with the FT2. It came in all black or with chrome top and bottom plates.
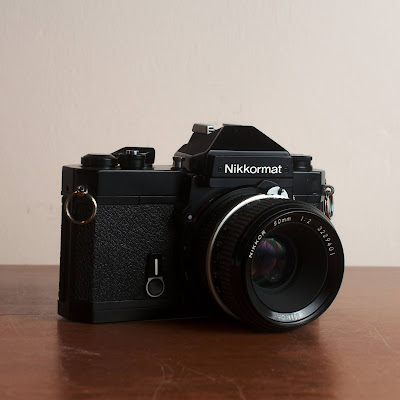


The camera body is die cast from an aluminum alloy. The top of the camera has the rewind crank, a light meter readout, the flash shoe, the depth-of-field preview button, the exposure counter, the shutter button and the film advance lever. The front of the camera has the self-timer lever, the shutter speed dial surrounding the lens mount, the film speed index, the shutter speed lever and film speed lock, the lens release button, the mirror lock and the light meter coupling pin. The bottom of the camera has the rewind release button, the tripod socket and the battery cover. The back of the camera has the viewfinder eyepiece. The left side of the camera has the flash PC socket and the latch for the back cover.

The shutter has vertically traveling metal curtains. It runs from 1/1000 to 1 second plus B. The shutter button is threaded for a standard cable release. The self timer gives about an 8 second delay. The shutter speed is set by using the lever on the dial surrounding the lens mount. The lever gets in the way of the lens release button when the shutter is set to 1/4 or 1/8 second. The instruction booklet advises against leaving the shutter cocked overnight or longer.

The viewfinder has a split image prism surrounded by a microprism ring at the center of the ground glass. There is a circle showing the center weighted area of the light meter. The meter needle is at the right and the shutter speed is visible at the bottom. The focusing screen is not interchangeable, although I think there were factory options for different focusing screens.

One improvement from the previous Nikkormat FTn is that the light meter on the FT2 was powered by a silver oxide button cell instead of a mercury cell. This means that the light meter uses a currently available battery. The battery compartment has the typical screw cover with a slot for a coin to turn the cover. The light meter can be set for film speeds running from ASA 12 to ASA 1600 using the index on the shutter speed ring. You pull out the catch on the shutter speed lever and slide the film speed index to the correct number for the film you have loaded in the camera. You need your fingernails to slide the index. The light meter uses a cadmium sulfide cell to read light through the lens. You get a good exposure under most circumstances by centering the needle visible in the lower right of the viewfinder or the one on the top of the camera as you adjust the shutter speed and lens aperture. The light meter uses the normal Nikon 60/40 center weighted system. The film advance lever acts as the meter switch. The meter is on when the film advance lever is pulled back to uncover the red dot on the top of the camera and off when the film advance lever is pushed in to cover the red dot.

The camera back is hinged on the right and has a latch on the bottom left. Loading film is like most manual 35 mm cameras. The film winds onto the take-up spool emulsion side out. The film counter resets to "S" for start when you open the back of the camera. It takes 3 pulls of the film advance lever to get to frame 1. The exposure counter is under a little magnifying glass on the top of the camera. To rewind the film you press the release button on the bottom of the camera and rotate the rewind crank on the top left.

To remove the lens you press the lens release button and rotate the lens to the right. To replace the lens you push the light meter pin all the way to the right and set the lens to f/5.6. You need to make sure the meter ears on the lens engages the meter pin on the camera when you put on the lens, then turn the lens counterclockwise until the lens release clicks. Finally you do the “Nikon Shuffle” by turning the lens aperture ring all the way to the left and then all the way to the right. This will set the light meter to the maximum aperture of the lens (f/5.6 to f/1.2, depending on the lens). You can check this by looking at the scale on the right side of the lens mount. A small red dot appears on the scale to confirm that the meter is set to the maximum aperture of the lens. If the lens does not have meter ears it is still possible to meter using the stop down method by pressing the depth of field button on the top of the camera. The meter coupling pin has to be pushed all the way to the right for this to work.  The camera can use any Nikon F mount lens with a manual aperture ring.  "G" type lenses will not work because the camera does not have the electrical contacts that control the aperture.

The mirror can be locked up using a slide on the lens mount above the lens release button. This allows mounting some Nikkor fisheye and wide angle lenses that protrude into the mirror box. Mirror lockup also can reduce vibration from mirror slap when you are using a telephoto lens.

This example is in decent shape despite the little dent in the back and works fine. It is a mass unit of a camera, weighing in at two and a quarter pounds. Nikkormat was the name for export models. The version for the domestic Japanese market was called Nikomat. The Nikkormat is your classic manual focus, manual exposure camera with a through the lens light meter. Nikon made the Nikkormat as a camera for photographers who wanted to use the excellent Nikon lenses but didn't want the professional F2 camera, or wanted a backup for their F2.


The Nations Silo on Centennial Blvd, Nashville, TN. Artist Guido van Helten painted a portrait of Lee Estes on an old grain elevator.