Wednesday, March 17, 2021

Minox Flash Attachments

Minox Gadgets, Gimmicks and Gizmos, Episode 3.

Here are three Minox flash units. These were not the only ones that were made, but they are three that I have.

Minox AG-1 Flash.


The Minox AG-1 Flash let AG-1 "peanut" flash bulbs be used with a Minox B. The flash unit was a battery-capacitor flash that used a 15V battery. The flash range was 15 to 40 feet with ISO 100 film. The flash unit used a small slide to retract the reflector and eject the flashbulb. Because flash bulbs are out of production, this is not really a useful device any longer.

Minox Flashcube Holder.


The Minox fashcube holder let flashcubes be used with a Minox B. Unlike most cameras that used flash cubes, the Minox did not turn the flash cube to a fresh bulb automatically. You had to turn the flashcube manually, which required a little care to avoid scorched fingers. Flash cubes are also a thing of the past.

Minox 8x11 Flash.


The Minox 8x11 electronic flash came out about 1990 for the Minox EC camera and has an adapter for use with the Minox B and later cameras. The original list price for the flash unit and an adapter was $49. The flash unit is made of black plastic. It uses one 1.5V AA battery. The Minox B will sync with the 8x11 Flash at 1/100 second. The adapter covers part of the meter window of the Minox B; therefore, you will want to remove the flash in order to use the exposure meter in daylight. The flash range is 6 to 12 feet with 100 speed film or 12 to 24 feet with 400 speed film. Using the green filter reduces the flash range by about 1/3. Using the neutral gray filter reduces the flash range by about 2/3. The unit is small (3 inches by 2 inches by 3/4 inch) and weighs 2-1/2 ounces with a battery inside. The 8x11 flash is probably the most useful flash attachment.

The earliest Minox cameras did not have shutters that synchronized with flash. The model IIIs that came out in 1954 was the first Minox that was sync'ed for flash.

Thursday, March 11, 2021

Minox Daylight Developing Tank.

Minox Gadgets, Gimmicks and Gizmos, Episode 2.

The Minox daylight developing tank holds one 50 exposure roll of film and just 56 ml of solution, and can be used in ordinary room light throughout the loading and developing process. The developing tank has three main parts: the drum, the sealing ring and the tank. The drum screws into the sealing ring, the end of the film hooks onto the drum, the film cassette goes inside a compartment in the sealing ring, and the sealing ring goes onto the tank. The interior of the tank is light tight. Turning the drum pulls the film from the cassette in total darkness and the film spirals, emulsion side out, around the drum as the drum screws into the tank. With 36 exposure rolls of film the drum does not go all the way into the tank. The tank is still light tight, but it uses about 10 ml more solution because the drum doesn't completely fill the interior of the tank. To help reduce developer waste, Minox had a doughnut shaped stop ring to take up the extra space. Once the film is loaded the chemicals for processing film may be poured into the tank. A thermometer inserted into the top of the drum monitors the temperature and serves as an agitator rod. Moving the thermometer up and down pumps the solutions around the film. After the film is processed and washed in the tank, the sealing ring is removed and the film is unwound from the drum and hung up to dry. The negatives are then cut into strips for filing in negative sleeves. Minox made an enlarger capable of making 11x14 inch prints from an 8x11 mm negative, a 30 times enlargement.

Tank, Drum, Sealing Ring and Stop Ring

Film Hooked to Drum

Assembled and Ready for Processing

Minox no longer sells film or chemicals. Currently Minox loads of color or black and white film are available from Blue Moon Camera and Machine, and any fine grain black and white developer may be used.

Minox had many accessories for sub-miniature camera photography. There are more episodes to come.

From a negative developed in a Minox daylight developing tank.

Saturday, March 6, 2021

Minox Lens Filters

Minox Gadgets, Gimmicks and Gizmos, Episode 1.

Built-in Filters.

The Minox B has three lens filters built in. The clear cover in front of the lens is a UV filter and is always present. The green 2x filter and the neutral gray 10x filter slide between the lens and the cover. The green filter is a contrast filter for black and white pictures, and provides exposure control for bright days outdoors or for flash pictures indoors. The gray filter provides exposure control for either black and white or color film. The selected filter stays in front of the lens until you slide it out of the way. Filters require increased exposure times as indicated by the filter factor. A 2x factor means twice the exposure.

Top to Bottom: UV, 2x Green, 10x Gray

With no sliding filter selected, you match the triangle on the exposure meter dial to the meter needle. With the green filter selected, you match the green dot on the exposure meter dial to the meter needle. With the gray filter selected, the meter automatically compensates for the filter and you match the triangle to the meter needle.


Snap-on Filters.

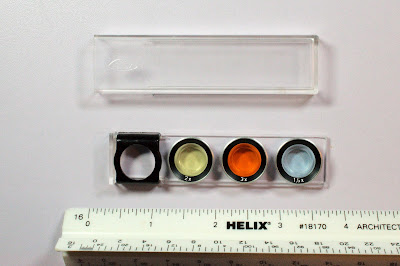
Minox snap-on filters fit a holder that snaps onto the camera. The holder has a white dot on the top to show which way is up so the holder matches the contours of the camera. The filters are tiny and easy to drop.

Black and White.


Minox black and white filters for the Minox B are yellow, orange and blue. Each filter has the filter factor engraved. They provide contrast control for black and white film. The yellow filter provides more contrast between the sky and the landscape. The orange filter is equivalent to the orange filter that is built in the Minox IIIS. The blue filter improves skin tones with flash.

Color.


The set of Minox color filters consisted of a light skylight filter, a medium skylight filter and a blue filter for flash pictures using clear flashbulbs. The color filters had the filter factors engraved on each filter. The light skylight filter is for sunlit subjects under a bright blue sky. The medium skylight filter is for subjects in the shade. The blue filter is for use with daylight balanced film and clear flashbulbs indoors. It would not be needed with blue flashbulbs or electronic flash.

Minox had many accessories for sub-miniature camera photography. There are more episodes to come.

Thursday, March 4, 2021

Vivitar 220/SL (1976)

The Vivitar 220/SL was manufactured for Vivitar by Cosina Co., Ltd. in Nagano, Japan, beginning in 1976. It strongly resembles the Argus/Cosina STL 1000 that came out in 1970. Vivitar was a trade name that Max Ponder and John Best used for imported lenses, cameras and accessories. Ponder and Best, Inc. eventually became Vivitar Corp. Vivitar was a bargain brand; the list price of a 220/SL with a lens was about $180.


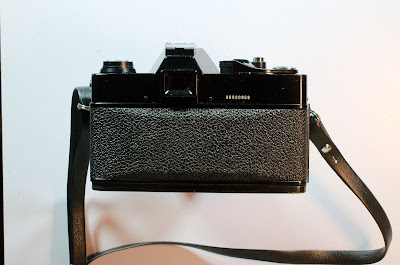
The camera has a metal body and a black finish. The top of the camera has the film loaded indicator, the rewind crank, the flash shoe, the shutter speed dial, the film speed dial, the shutter release, the film advance lever and the exposure counter. The front of the camera has the self timer lever, the M42 lens mount and the exposure meter switch. The bottom of the camera has the rewind button, the tripod socket and the battery compartment. The left side of the camera has PC sync sockets for flash bulbs (M) and electronic flash (X).

The shutter speeds run from 1 second to 1/1000 second plus bulb. The shutter is a metal, vertically running Copal shutter that syncs with electronic flash at 1/125 second or longer exposures. The shutter is completely mechanical. No battery is needed except for the light meter.

The lens mount is a 42 mm screw mount (Pentax/Praktica/Universal/M42 lens mount). The camera came with either an f/2.8, 55 mm lens with four elements in three groups or an f/1.8, 50 mm lens with six elements in four groups. Most M42 mount lenses will fit this camera. An f/2.8 35mm Vivitar lens is on the camera now.

The camera has a through the lens exposure meter. The meter needle is visible in the lower right of the viewfinder. To get an exposure reading you press a switch on the lens mount to simultaneously stop down auto diaphragm lenses to shooting aperture and turn the light meter on. The picture is correctly exposed when the needle is centered between the brackets, underexposed when it is down toward the "-" sign, and over exposed when up toward the "+" sign. The meter gives an average reading over the entire picture and can be fooled by uneven lighting. The meter can be set for ASA (now ISO) film speeds from 24 to 1600. With 100 speed film the metering range is from EV 3 (average indoor scenes) to EV 18 (extremely bright daylight).

The exposure meter is powered by a size 675 button cell. The required 1.35 volt mercury cell is no longer available because of the toxicity of mercury. A 1.4 volt zinc-air hearing aid battery is close, but the meter readings on my camera were not very accurate with a hearing aid battery. You can just ignore the camera's meter and use a handheld exposure meter or use the camera settings recommended in the data sheet for your film.

For focusing the viewfinder has a central micro-prism circle surrounded by a ground glass ring. The micro-prisms tend to black out with telephoto lenses. When that happens you would use the ground glass area to focus.

The rewind crank pulls up to open the back for loading film and the exposure counter resets to "start" when the back is opened. It takes three pulls on the film advance lever to reach the first frame, and one pull on the lever to advance to subsequent frames. An indicator next to the rewind crank shows red when there's film in the camera.

The Vivitar 220/SL is an average, low-price, manual 35 mm SLR. You can buy one nowadays for about $20.

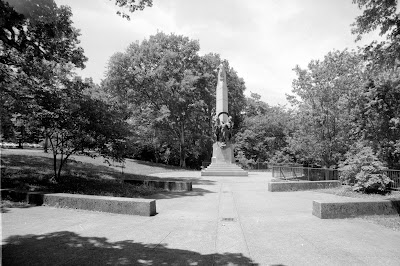
Sample Photo with a 28mm wide angle lens